Pages
▼
April 26, 2012
Sprinter Sliding Door Handle Fix
See here for an update on the door: that-dang-sprinter-sliding-door I've had a lot of subsequent trouble with it.
My sliding door handle broke and wouldn't open the door at all while I was on my trip last summer. I ended up using the driver's door instead, which the dog adapted to quickly. With research, mostly on Sprinter-source.com, I found it is a fairly common problem. The plastic inside handle is prone to breakage at the crucial lever point. I did this fix last fall but didn't document it then. I haven't yet looked for a replacement part, but I should ...
A Little Cleaning, A Little Insulating
I cleaned out the new refrigerator after a bit of shopping yesterday morning. and put it all together with the bins and racks in place. It is ready for use. I was unable to find a replacement for the thermometer I broke locally so I ordered a few new ones of the right size from Amazon. What would we do without Amazon? Seems there is less and less choice in local stores. Then I put the cabinet doors back on. I removed them to be able to slide the refrigerator down the aisle. And on to cleaning out the bath and cab.
April 21, 2012
I Have a New Refrigerator!
 |
| Refrigerator installed with ASU Remote above it |
April 19, 2012
Test Fit the Refrigerator and Getting ready for the Install
 |
| Test fit the new refrigerator |
I took the doors off the refrigerator to check the fit. Even with the door off, it just barely slid by the narrow part of the van aisle. It just barely gets into the cavity due to the cabinet face trim. I can recess it a bit over a half inch and still have room for the lock to swivel and the compressor just clears the rear inner wall. So, the cavity is ready for the actual installation.
April 18, 2012
Vents Installed
Last night, I installed the new vents. I pressed the butyl tape against the flange, removed the paper, then pressed the vent cowl into the vent hole. I had some difficulty with the aluminum backers because I missed the pre-drilled holes, but got them in in the end. I used a plastic putty knife to cut away the excess butyl tape. It is kind of gooey and stringy. The vent flange doesn't fit exactly against the van skin because of the curvature of the wall. The butyl tape fills the gap so I hope it will work properly.
April 16, 2012
And More Painting ...
The gray primer is definitely a better base for white paint than the brown primer is. On a whim, I decided to go over the outside edges with the same Rustoleum Gloss White paint as I'm using on the interior metal. Wouldn't you know it? It matches the original white paint better than the GM Arctic White touch up paint. Granted, the original paint is a bit drab after 8 years in the weather, but it isn't anything that a good washing wouldn't improve.
April 15, 2012
More painting
 |
| Gray primer |
April 14, 2012
Painting
 |
| Bondo applied to side of vent |
April 13, 2012
De-Rusting
 |
| Inside of upper vent - not much rust. |
April 11, 2012
The Fridge Cavity and Vents - Problems!
 |
| Fridge cavity - original |
April 5, 2012
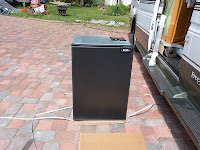
Refrigerator - Delivered
 |
| IsoTherm CR130 as delivered |
April 3, 2012
Refrigerator on the move
I got an email from the company that I bought the new refrigerator from yesterday saying that it is shipped! It could be delivered later this week. It is coming up from Florida where the manufacturer distributor is. I was prepared for a long wait but this is rather quick! Unfortunately because it is on a truck, I don't get a tracking number. I will just have to wait for the call.


