Design:
My boxes need the following attributes:
- Easily removed
- Minimal permanent change to existing stock van - if I sell it, I'll be glad for this
- Strong enough to be solid under weight and movement of the van
- Maximize the space underneath while keeping sufficient space above the bed to be comfortable sleeping, rolling over, & lounging in bed reading.
- The space underneath needs to be accessible.
- Be attractive
 |
| Boards cut for one box |
To keep the weight down and improve accessibility, I decided the end of the boxes that go against the rear doors could be open with just 1'x3' boards for support. I thought at first that the side of the board against the van wall would need an extra support because of the curvature of the van wall, but it turned out not to be needed. A simple box worked well.
 |
| Clamp pocket screw jig & drill |
 |
| Clamp the slats to drill the pockets |
Construction:
1. Cut 4 long boards (45.75") and 2 side boards (23 3/16") for the forward end to make 2 boxes. Cut 6 1x3 boards (21.75") for rear ends. I wanted the forward side to have its end on the long side so I could apply a trim piece to cover the edge grain. The slats sit inside the box.
2. Cut 6 pieces of 3/4" trim to cover the exposed edges a bit longer than the 7.5" of the boards. I used beaded trim pieces. Glue and clamp the trim pieces on the front edge of the side boards and ends of the long boards in the rear.
 |
| Glue trim to edges |
 |
| Right angle clamp to screw the pockets |
 |
| Clamp rear board to side |
 |
| Clamp & screw rear slat |
 |
| Test the fit in the van |
4. Clamp and screw a couple of pockets to test fit the box. Then disassemble.
5. Sand, sand, sand all boards with 80 grit, then 120 grit to get them smooth. I turned the sander to 45 degrees on all the edges to give them a slight rounding. Wipe the sanding dust off and stain. Before I stained the boards, I wiped them pre-stain to ensure an even color. After the stain dried, I used Minwax wipe on polyurethane varnish. Between each coat, I gently rubbed it with 0000 steel wool dampened to get it smooth. I put on 4 thin coats on all sides to prevent any potential warping of the boards.
 |
| Bolt on rear in back |
 |
| Box in place |
 |
| Plate for bolt, front |
 |
| Bolt test fit hole on front |
 |
| Slice chamfer on corners |
 |
| Middle supports ready to stain |
7. To ensure the boxes don't shift when in motion, I put 2 surface bolts on opposite ends of the boxes. They are the type of bolt used on French doors. I just drilled a couple of holes in the existing bench top to give the bolt room to hold the box. With the plate, it holds nicely.
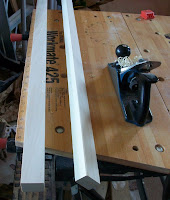
8. To support the middle cushion, I glued & clamped two half inch x 1.5 inch poplar boards together to make a 1" thick board. I then used a plane to trim a chamfer on all the edges of the boards to ease the edges. Sand it well to make it really smooth. Stain & varnish. I then clamped and screwed the boards about 3/4 inch below the top of the boxes on the front. These receive the 3' support board for the middle cushion.
 |
| Nissa, the cat approves |

Looks awesome! How are your kitties doing? xx Natalie / Cat(at)OzziCat.com.au
ReplyDelete