 |
| IsoTherm CR130 as delivered |
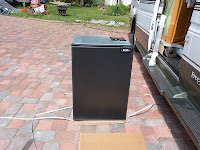
UPS has a freight delivery service and a big semi-truck pulled up by my driveway. I brought my wheelbarrow down (only 60 pounds in the box) and moved it up my driveway to the van. Unfortunately, I also had to take delivery of the mangled pallet and plastic so I will have to dispose of that. Of course, I unboxed it immediately. The door is on the left and the door is matte black as I requested. So far, it is exactly right.
 |
| Compressor. ASU is the red rectangle |
 |
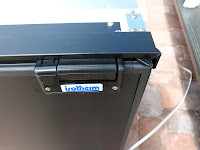
| Door latch with lock open on right corner |
 |
| Door lock closed |
 |
| Set into van for safe keeping |
 |
| The cavity. The lip with the black needs removing. |
I will hook it up temporarily to test it's function before installing it. I can see a blue freeze pack under the freezer compartment.
The cavity where the old fridge was needs some work before I can mount this one. There's an inner lip installed with some weatherstripping that needs to be removed so it is wide enough for the new fridge in the back. The old propane one had to be sealed from the cabin to prevent carbon monoxide from entering the living area. This one is all electric so that isn't a concern and it is deeper than the old one. They put in blocks next to the inner thing that I can't figure out what the purpose was.
There is about 3 inches more height to the cavity than the refrigerator needs. There is also a remote control unit that needs a home. (It was not possible to find an exact size for any type of fridge.) I'm thinking that mounting the refrigerator on the floor of the cavity leaving the room at the top might be a good strategy. I can insulate the top, maybe leaving a space where I could store a tray might be a good solution. Then I could mount the control right above the refrigerator where it would be most convenient.
It came with mounting brackets. They are not flush, tho and interfere with the cabinet door right next to the fridge cavity as they stand proud of the cabinet face. There isn't much to them - just L brackets with screw holes. There are no pre-drilled mounting holes on the side of the fridge. I might just get some metal L brackets and make my own. The old fridge had screw mounts that were accessed from inside the fridge and went into strips of wood on the side of the cavity. This one does not. The top bracket is vented but there is plenty of ventilation in the van wall so ventilation in front to the cabin area is not needed. I didn't know exactly how the brackets were made, so I didn't know whether to ask for something different. Isotherm does not require their brackets be used, only that the fridge be firmly secured.
I need some extra 10ga wire as I think the existing wires are a bit tight, connectors, insulation, mounting stuff and trim for the outside cabinet to finish it off. I think all I have to do is connect the 12V wires to the ones already in the cavity. Those already go to a 15amp fuse in the house fuse block, then to the battery for power. There have been a lot of reports that the ASU works loose and needs to be secured better. It is wedged behind one of the compressor pipes but i will see if I can secure it better.
Update: It took a ridiculous amount of fussing to get temporary wiring to it, mostly because my temp wiring is far from ideal. I succeeded in getting power to it after changing out the light bulb to the 12VDC one (included). It works! In just a few minutes, the freezer was noticeably cold. It is very quiet. First priority is to verify the fridge works properly before installing so I could get the company to fix it if needed. Looks like there is no need. One thing I noted is that the wires into the ASU are a bit loose. I will put on cable ties to make the connections firmer when I install it.
As for the interior fridge features:
- 2 wire shelves , each 14" deep X 17 3/8" wide with a wire lip to keep things from falling out.
- 6 positions for the wire shelves.
- Cavity height from glass shelf to bottom of compressor: 15 1/2"
- Height between glass shelf and lowest wire shelf position: 1 7/8"
- Each has a lift up slot on the right side
- A glass shelf in 2 parts covering the plastic bin on the bottom - 4 1/2" high from the floor. This keeps the bin a bit warmer than the rest of the fridge.
- The compressor takes up most of the upper right but a shelf is around it:
- In front: 3 1/2" deep X 7 1/4" wide X 6" high with a lip.
- Along side: 1 1/2" wide X 13 7/8" deep X 6" high
- Freezer: 13 3/4 deep X 8 1/4" wide X 3/12" high with rounded edges. It is not meant to freeze warm things but to keep already frozen things frozen for a while.
- Door: 3 stationary shelves
- Bottom: 3 5/8" deep X 15 3/4" wide X 14" high. 5 sliding dividers 1 3/4" deep
- Middle: 2 1/2" deep X 15 3/4" wide X 7 1/2" high. With rounded can molding on back
- Top: 2 1/2" deep X 15 3/4" wide X 3" high.
- The door front is not a hard surface so it will probably be easily damaged. But then, it is also easy to put a different door front on it.
- The latch is nice. Press down to open. There is a way to press another part to keep it from latching closed to air the fridge.
- There is a little lock to swivel to the side to open and to the front to lock the door.
- Interior light in the upper right corner.
- Plastic water tray under the freezer. Coldpack is above that.
- Top and back are covered in an aluminum sheet, folded to the sides.
- Sides are covered in a gray plastic covered cardboard.
- The front edges and top are covered in gray vinyl, about 3" wide. All the door/latch screws go thru the vinyl.


No comments:
Post a Comment
We love comments. Thanks for giving us your thoughts.